Let’s start with the age-old question of why?
I know, ready-made modules are available out there, that can do the same for the same cost or lower – but I didn’t make any of those.
During one of my searches for samples over at the maxim website (Maxim-ic.com) I came across a nice chip – MAX9768, a mono 10W Class-D amplifier chip. I put some in my samples cart – audio amps are alwaysa big fun to play with. This one would work filterless and still meet EMC standards if speaker leads were under 10cm. perfectly doable. I did however, forget to look at the package. a 24-pin TQFN with 1mm pitch. Ouch!
The chip lay dormant in my ‘samples’ box for more than a year. then, I got contacted by some of the amazing people from FabLab Danmark and a project emerged. The task was to make a small boombox for people to make at the Roskilde Festival Makerspace. Challenge accepted.
I found the MAX9768 chip and compared it to some of the other amplifier chips I had. It won by being filterless and very easy to implement. The boombox were going to be a single-speaker solution, so this mono chip would be perfect for the job.
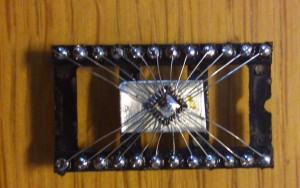
Now, on to the prototyping. I had to mount this chip somehow. This is where my apparent fetish for SMD soldering-by-hand comes to life. I present to you – 24-pin TQFN dead-bug style:
Sorry about the poor quality but I think you get the idea of how small it is. The break-out is 0.1″ breadboard friendly size. the chip itself is 4*4mm.
Breadboarding the rest of the system was quite easy – in total 9 components are required to make this amplifier work. this includes a potentiometer for analog volume control! The chip also have I2C volume control and a sync feature that allows multiple amplifieres to be cascaded. I don’t know if it will allow to set them up in parallel, but right-left systems should be possible using the first chip as a master, providing the clock signal for the rest of the chips.
It quickly turned out that the breadboard is not meant for high-frequency design like this. The datasheet states that output is a spread-spectrum modulation with a center frequency of 300kHz, changing +- 7kHz to minimize the emitted noice hence allowing filterless operation.
Obvious solution to this was to mount all components directly to the pegs on the breakout board which proved to be somewhat difficult because the heat transfered through the ‘bonding’ wires melted the solder on the chip. I soon found myself resoldering the small wires on the chip with huge through-hole components very close by obscuring my view. but I succeded! It worked! And although the 10W is at 10%THD and the numbers look really ugly on paper, it plays really nice! I mean, comon! It’s meant to be taken to a festival! People will rather have a boombox that plays really loud than one that plays with 0.0001% THD…
Next thing – PCB design. Stay tuned.


Hvilket pcb design program benyttes ?
Jeg bruger DesignSpark PCB, som kan hentes gratis fra designspark.com
Pingback: louder, Louder, LOUDER! (or: more dead bugging) | Death and the penguin