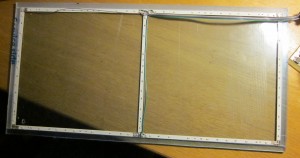
This post will deal with the construction of the display segments. Not the individual strands of LEDs – they are done already. Instead the post will be about the casing that the segments will have.
I started out by testing the Ledberg lamps (see previous post). Since it worked so well I had to find a way to secure the lights from the weather. The idea I have been using is simple and easy to make and is made entirely from acrylic sheets – plexiglass.
I am making a sandwich structure with a sheet of acrylic on the top and bottom. In between I make a small piece of acrylic sheet in the corners of the big sheets. this way I get a cavity in between all the sheets. all of the acrylic is 3mm thick so the cavity itself will also be 3mm. This is plenty of space for the ‘naked’ Ledberg lamps, which I have removed from the original housing.
![]() The picture shows a cut-through section of the display segment.
The picture shows a cut-through section of the display segment.
Also, the cavity is big enough for a ribbon cable to fit, so I can make the connections to all of the segmens inside.
The completed display with wires and connector. For all segments inside the display the 12V are connected in both ends. The connector which is right outside the picture frame is an RJ45 connector with 8 pins. Just enough for the common anode (12V) and the seven cathodes. I haven’t looked the ratings on the connectors up but I am expecting to draw excessive currents through the plug.
The connector has to be glued to the back side of the display in the lower right corner. On the above picture that will be the top right corner. Lastly, the top acrylic sheet will come on and a layer of transparent silicone sealant will be placed all the way around the edge of the acrylic layers. this way I can ensure that the sandwich is as close to waterproof as I can get it without having to do a lot of work. The connector on the backside will also be coated but it should still be possible to disconnect the cable for maintenance.
Now all I have to do is repeat the steps 3 more times – then I have the displays ready!


